The Importance of Roof Repair

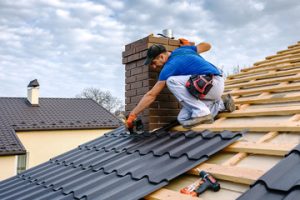
The roof is one of the most important parts of your home or business. Regular inspections and maintenance ensure it remains in good condition and protects the structure from the elements.

Roof Repair

Roof Repair Massachusetts is typically less costly than replacement, and extend the life of your roof. However, a thorough roof repair can also address hidden issues that could lead to additional damage and expense down the road.

Leaks can be a big problem for homeowners, and they often require professional repair services. If left unattended, water can cause significant damage and affect the interior of your home. Moisture also promotes the growth of mold and mildew, which can pose a health hazard to your family.

If you suspect you have a leak in your roof, it’s important to find the source as quickly as possible. You can do this by observing stains on your ceiling or walls and by listening for the sound of dripping water during rainstorms.

Once you’ve identified a potential source, you can start to narrow down your options for roof leak repair. You’ll need to have a good ladder and safety equipment, such as a hard hat, goggles, gloves, and a caulking gun. Before you begin, make sure that the weather is clear and that there are no other sources of water entering your home.

One common reason for a roof leak is the age or condition of the flashing. This is a thin strip of metal that helps keep water out of vulnerable areas like chimneys, vent pipes, and skylights. Heavy storms or wind can damage flashing, causing it to crack and let water in. If the flashing is old or damaged, it may be necessary to replace it.

Other causes of roof leaks include cracked shingles, improper installation of skylights or roof vents, and broken or missing gutters. It’s also important to regularly clean your gutters to prevent clogging, which can lead to pooling water on the roof.

If you have a lot of tree branches and other debris overhanging your roof, it can block the flow of rainwater. This can cause water to accumulate in a small area on the roof and eventually leak into the home.

If your current roof leak repair is not working, it might be time to hire a professional roofing contractor to perform a full inspection and make repairs. If you aren’t comfortable crawling around on the roof, hiring a professional is the best way to get a quick and reliable repair.

Damaged Shingles

A roof that is free of damaged shingles is essential to keeping your home safe and protected. If left unchecked, shingle damage can lead to water leaks that threaten the integrity of your home’s structure and interior. Addressing shingle issues promptly prevents further damage and saves money compared to a complete roof replacement.

A well-maintained roof is a key part of maintaining or increasing the value of your property. A dingy or damaged roof detracts from the overall curb appeal and may turn off potential buyers. In addition to boosting your home’s value, timely roof repair and maintenance can keep your family and belongings safe and comfortable.

In general, most shingle repair is a fairly straightforward task for homeowners with a little experience and basic tools. The most important tool is a ladder that allows you to safely reach your roof. You’ll also need a flat pry bar and a hammer for driving nails and a utility knife for trimming or cutting shingles if necessary. Lastly, you’ll need roofing nails and replacement shingles that match your existing roof as closely as possible.

The most common sign of a shingle problem is visible damage to the outer layer. Typically, a shingle will lose some of its granules over time due to exposure to extreme weather conditions. When granules lose their protective properties, the asphalt layer beneath becomes exposed and susceptible to leaks and other deterioration.

Other signs of shingle problems include buckling, curling, or breaking. These issues allow moisture to seep under the shingles and into the interior of your home, potentially damaging insulation and causing rot. Leaks and other shingle damage can also occur when tree branches or other debris fall onto your roof during storms.

When identifying shingle problems, it’s best to consult with a professional roofer as early as possible. They will be able to provide an accurate assessment and recommend any necessary repairs. It’s also a good idea to conduct visual inspections of your roof regularly. By conducting these inspections, you can catch shingle damage early and avoid costly roof repair later on.

Flashing

When you have a leaky roof, it can damage the interior of your building and cause serious problems. Roofing professionals use flashing as part of a weather-resistant barrier system to prevent water penetration at seams and joints. Flashing is made from durable materials like metals and plastics and is installed at points of penetration or intersection in a roof. It forms a seal around penetrations such as chimneys, skylights and pipes.

If your roof is showing signs of leaking or has been damaged by the elements, it’s time to call for a professional inspection. A roofing expert will locate the source of the problem and make repairs to stop the leak. This may include removing and replacing damaged shingles or repairing flashing.

Flashing is also used to protect areas where a roof meets a wall. It’s important to have flashing in these areas because they are the most vulnerable to water damage. This can be caused by the buildup of snow or ice or because the materials in these areas are more porous than other parts of the roof. Flashing can be a simple L-shaped piece of metal or it can be more elaborate, such as the “Z” flashing you see on chimneys and some walls. To install Z flashing, the first step is to find a spot on your wall where the upper leg of the flashing will terminate. Next, snap a line with a level or tape measure across the gap from where the ledger board, trim or siding ends to where the wall starts. Then, using a pair of pliers or other tool with sharp jaws, bend the flashing to fit over this area. You can add caulk or another waterproof material to the joint for added protection.

There are also specialty types of flashing for areas such as peaks and corners. These may require special materials or a different installation process. A professional roofer can help you determine which flashing is right for your needs and will provide the correct type and method of installation. In addition, they can advise you on how to properly maintain your flashing to extend its lifespan.

Roof Deck

While your roof shingles and tiles help protect the structure of your home, your roof deck is what keeps water out. It also helps moderate moisture levels in your home by allowing rain and snow to evaporate through the attic. If your roof deck becomes damaged, it can cause a wide variety of problems.

One common problem that can affect your roof deck is rot. This is the result of extended contact with moisture, which can be caused by a variety of factors, including an improperly installed roof, leaks, and natural weather patterns. If left unchecked, rot can spread to the framing and other parts of your home, creating structural damage and mold growth.

Other issues that can impact your roof deck include sun damage, leaks, and moss or mildew. Inspecting your roof every season is a good way to spot these problems before they get out of hand.

A damaged roof deck can lead to a number of other problems, from visible sagging of the ceiling to serious structural damage. A damaged deck can also make it difficult to install shingles or other roofing materials, which will further weaken the overall structure of your roof.

Depending on your location, you may need a permit for any work done on your roof, especially when removing existing shingles or outer roofing materials. It’s also important to follow all safety guidelines when working on your roof, including wearing hard hats and using fall protection.

When replacing the roof deck, it’s important to use plywood or OSB roof decking, along with a proper layer of underlayment, to ensure the integrity of your roof. It’s also important to replace the shingles or other roofing material that was originally in place if necessary.

It’s also a good idea to inspect the rafters and trusses underneath your roof before starting any work. Any damaged or rotten sections should be repaired or replaced before attempting to install any new roofing materials. During this inspection, it’s important to ensure that the rafters and trusses are aligned properly and spaced according to building codes.

Important Steps to Take Before a Roofing Installation

A new roof will add beauty and value to your home. It will also protect against leaks and damage from the elements. Features like chimneys, vents and TV satellite dishes require flashing for added protection against water infiltration.

Roofing

Choosing the right roofing contractor for your job will make the installation process as smooth as possible. Contact Burlington Roofing for professional help.

Thorough preparation ensures that the roof renovation proceeds efficiently, your property remains protected and safe, and disruption to daily life stays manageable. Here are some of the most important steps to take before a roofing installation:

Contact Your Local Building Department: Check with your local building department to determine whether or not a permit is required for your project. If one is, prepare by completing the application process and paying any applicable fees. It’s also a good idea to verify that your contractor is licensed, insured, and certified to guarantee professionalism and industry expertise.

Protect Indoor Items: If possible, move artwork, mirrors, framed photos and other decorative items to another area of the house to avoid damage from vibrations caused by the hammering on the roof during the tear-off and installation processes. In addition, if your house has a lot of furniture or large items stored in the attic, consider removing them prior to starting the work. This will help make the job easier and more efficient for both you and your roofer.

Clean and Cover Outdoor Items: Make sure to remove or cover any outdoor items, such as patio furniture, grills, potted plants and lawn ornaments, to keep them from being damaged by dust or debris during the roofing project. It’s also a good idea, if you have pets or children, to arrange for them to stay with friends or family members during the roofing process.

Gather the Proper Tools and Supplies: You’ll need basic tools, such as a ladder, hammer and utility knife, and specialized ones, such as a roof rake, broom, brush and a tool bag or bucket for keeping materials organized. You’ll also need to have a respirator and protective gear for working on the roof.

Underlayment: You’ll need an underlayment for your new roof, which is designed to prevent leaks and protect the sheathing and shingles. There are several different options available, including synthetic underlayments that offer superior tear resistance and water resistance, as well as self-adhering materials that simplify installation.

Finally, you’ll need to add ridge cap flashing, which is a metal material that covers the top peak of the roof to prevent moisture from sneaking into joints and chimneys. A top-tier roofer will carefully install this step with precise craftsmanship, ensuring that your new roof is properly sealed and weatherproofed.

Installation

The roofing installation process is where the rubber hits the road. This is the phase where any mistakes can be costly. This is also the phase where local building codes dictate specific standards that must be followed to ensure safety and adherence to regulatory requirements. Professional contractors are familiar with these regulations and can guide the project to a successful conclusion.

Start by removing any existing shingles and underlayment. Take care not to damage any landscaping, plants or bushes near the house during this stage. Use large tarps to protect landscaping and other movable items, and keep a dumpster nearby to toss the old materials as you remove them.

Next, install metal drip edge along the eaves. This prevents water from pooling on the roof and, depending on the climate, can help protect against ice dams. It’s important to seal any exposed nails on the vents and stack flashing, as well. The best product for this is Lexel, which is clear like silicone, sticky as model glue and lasts a long time.

Install the new shingle course by row, beginning at one end of the roof and working toward the other. Ensure that each shingle overlaps the previous one by at least three inches. Use starter shingles (half the width of regular ones) at the beginning and end of rows, as well as in valleys. These have an adhesive strip that helps hold down the shingles you place over them, and they help to prevent water leaks at the seams.

As you work, check the weather constantly to ensure that the roof is not too hot or too cold to work in. If possible, work during the spring or fall, when temperatures are moderate. If you’re tackling a residential roof, remember that chimneys, dormers and other features add complexity to the installation process, and may require additional materials like flashing.

Before you begin installing the metal roofing panels, make sure to measure and cut them to size. Use tin snips or a metal shear to get clean, precise cuts. As you work, always overlap panels according to the manufacturer’s guidelines. Remember the old adage, “measure twice, cut once.”

Inspection

After the roofing material has been installed, it is time for a thorough inspection. The inspector will walk on the roof (if weather permits) to evaluate the materials and look for any damage or areas that may require attention. They will also examine the gutters, downspouts, vents, skylights and chimney. If the home has a crawl space, they will look at the vapor barrier, insulation and any potential water intrusion problems.

During the inspection, the roofing contractor will also evaluate the condition of the roof decking and sheathing to ensure it is solid and free from damage. They will replace any damaged sheathing as necessary. Next, they will lay the underlayment and starter shingles to create a waterproof barrier on the roof. Finally, the ridge cap and vents will be placed to complete the watertight seal on the roof.

A professional roofing contractor will follow industry best practices when installing the shingles and other materials. This will contribute to the longevity and performance of the new roof. They will also follow local building codes and regulations to avoid future legal complications.

When hiring a roofing contractor, you should look for one who is licensed, insured and certified by a reputable association. This guarantees professionalism and expertise. They will be able to address any concerns and questions you have during the installation process.

While a roofing installation is in progress, it’s important to keep the lines of communication open with the contractors. This will help prevent misunderstandings and delays in the project.

In addition to inspecting the roof, a home inspector will examine other aspects of the property, including the electrical system, plumbing-related issues and pests. They will also look for signs of foundation settlement and other structural damage. This includes uneven or bouncy floors, cracks in basement walls, stones and bricks that are loose or missing, gaps around door and window frames, and damage to stairways and front porches.

Depending on the state, a home inspection will also cover the HVAC system, including thermostats, distribution systems, and chimneys. They will also assess the radon level, mold and mildew.

Maintenance

Whether you’re having your roof installed for the first time, or replacing it after a hail storm, or simply want to extend the life of your home’s existing roofing materials, proper maintenance can save money, protect your investment, and ensure that your warranty stays valid. Depending on the environment, your roof may require periodic inspections to keep minor issues from escalating into costly repairs and improve energy efficiency and curb appeal. Your contractor should be able to perform most of the required maintenance on your roof, but it’s always best to have a checklist handy in case you ever need to do any roof-related work yourself, such as checking out the flashing (the narrow, galvanized material that’s often installed around chimneys, vents, skylights, and TV satellite dishes). This will help you avoid the risk of injury or voiding warranties.

Roofing Maintenance – Prevent Leaks and Extend the Life of Your Building

Performing surface maintenance on a roof can help prevent expensive repairs and extend the life of your building. This can include removing debris, inspecting and repairing minor damage, and cleaning gutters.

Roofing

Make sure previous repairs are listed separately on the maintenance checklist. This will ensure future inspections can see what was done and double check that the repairs were made correctly. For professional help, contact Arthur’s Roofing.

A leaky roof is one of the most frustrating and costly home problems. It starts with a drip or faint stain and can lead to mold, water damage, swollen wood, ceiling collapse, rotted insulation and other expensive repairs. Leaks also cause structural damage, destroying beams and joists. To prevent them, you can use a simple checklist to check your roof regularly for signs of trouble like damp spots, bubbling paint or water stains.

Leaks are more likely to emerge around roof penetrations such as chimneys, vents, skylights and flashing. Examine these areas carefully to make sure caulking and seals are intact. If they’re not, reapply them and be careful not to leave any gaps where moisture can sneak in.

For shingle roofs, look for any missing shingles or shingles that are cracked, damaged, curled, buckling or blistering. You should also inspect for moss or fungus, which can degrade the surface of your roof and cause leaks. If your roof has metal vents, check the housings for any cracking or broken seams. You should also replace the caulk around these elements, and be sure that the screws that attach them aren’t pulling out.

When checking for a leak, it’s helpful to have a helper and a garden hose. Start by soaking one area just above where the leak appears in the house, and then move up the roof a few feet at a time, spraying the suspected area. Have your helper stand inside to yell when water appears, signaling that you’re in the vicinity of the leak. Continue this process until you find the source of the leak, which may be a corroded metal flashing or a hole in the underlayment.

For a more thorough inspection, consider hiring a professional to perform an infrared thermal imaging scan of your roof. This technology can reveal areas where water is entering the home due to temperature differences in the roof structure. Then, a qualified professional can determine the cause and fix it before the problem gets out of hand.

Clean the Gutters

Gutters are essential for directing rainwater away from the roof and home, but they can’t do this job properly when they’re full of debris. Clogged gutters can cause expensive damage to both the roof and home, so it’s important to regularly clean them.

Gutter cleaning is a messy job, but it’s one of the most important tasks on any roof maintenance checklist. It’s recommended that you clear your gutters twice a year, once in the late spring and again in early fall. In addition to preventing water damage, regular cleaning can help prevent a buildup of moss and other damaging plant growth.

In addition to being an eyesore, a clogged gutter can be the source of water leaks throughout your home. This can cause wood damage and even mold and mildew in the attic or basement. The only way to prevent this is by routinely clearing out your gutters.

Another problem caused by clogged gutters is pest infestation. Birds, rodents, and other insects often seek out stagnant water or nesting spots in clogged gutters. Regularly cleaning your gutters can eliminate these unwanted guests and help keep your home healthy and safe.

Lastly, a clogged gutter can cause your foundation to crack as it tries to cope with the extra water pressure. This can happen particularly if the gutter is overflowing or if it’s clogged with leaves and other debris. Gutter cleaning prevents these problems from happening and can save you the cost of foundation repair in the future.

If you choose to clean your own gutters, make sure you follow this guide for roof-safe gutter cleaning. It’s important not to use metal tools, sprayers, or walk on the roof unless absolutely necessary, as these can damage shingles, flashing, and underlayment. It’s also a good idea to have a spotter or helper to hold the ladder in place and provide support when you need it. And don’t forget to check and clean the downspouts as well, as these can also become clogged with debris. By following these simple steps, you can avoid the common mistakes that cause costly gutter repairs.

Trim the Trees

Tree branches that touch the roof can scratch or crack shingles and even create holes. Over time, this can lead to expensive repairs. Trimming your trees can prevent this from happening by keeping them a safe distance away from your roof. In addition to reducing the risk of damage, regular pruning can also help keep your trees healthy by getting rid of dead or overgrown branches.

Overhanging branches can scrape against the shingles during windy weather and cause further problems with the integrity of your roof. In addition to the damage they can cause, these branches can encourage the growth of moss and mold, which further weakens shingles and roofing materials. In addition, they can clog gutters and create moisture buildup around the roof, which leads to water leaks in your home.

If you have a mature or older tree, it’s a good idea to consider hiring a professional arborist for regular trimming services. They have the equipment and training to prune a variety of trees safely, including removing branches that hang over your house. This helps to prevent damage to your roof, siding, windows, and driveways. They can also identify the health of your trees and recommend any additional maintenance needs.

In addition to removing overgrown branches, tree trimming can also prevent insect infestations by creating a less inviting habitat for pests. Ants, termites, and squirrels often find shelter in overhanging branches, and they can cause extensive structural damage to your home. They also increase humidity levels and promote mold and mildew growth.

A regular yearly inspection of your roof and the surrounding trees is important. Inspect your shingles for damage and look for leaks, especially after a rainstorm. If you see signs of a leak, it’s important to call a repair service right away to prevent further damage to your home.

If you notice a problem with your roof, such as a crack or hole, it’s a good idea to contact a repair company for an inspection. A repair company can help you get your roof back to its original condition by replacing damaged shingles and fixing any other issues that are found.

Inspect the Roof

A thorough roof inspection should include a careful examination of the roofing materials themselves. The inspector looks for signs of damage, wear and tear, and potential issues that could affect the roof’s ability to protect the building from water infiltration. This includes looking at shingles, tiles, and metal plates; assessing cracks in flat roofing materials; and inspecting the flashing around chimneys, vent pipes, skylights, and other roof interruptions. It should also include a visual assessment of the interior of the building, including looking at water stains on walls and ceilings and examining the insulation for dampness.

In addition to the roof’s surface, the inspector should examine the rafters and trusses that support it; these should be sturdy and free from any obvious signs of structural damage or rot. They should also look for any gutters and downspouts, checking for damage or clogs. This is a vital step in protecting the integrity of the roof; water intrusion through clogged gutters can lead to rot, which can compromise the structure of the roof and cause leaks.

As part of the material inspection, the inspector should also check the shingles or tiles for signs of damage, such as bubbling or blistering, which can indicate moisture intrusion. They should also check for granule loss on shingle surfaces, as this can indicate that the shingles are becoming worn out and may need replacement. If the inspector can gain access to the attic, they should also look for any evidence of mold or mildew; this can signal a problem with moisture penetration and/or ventilation.

The inspector should also examine the ridge vents, turbine vents, and neoprene pipe boots to ensure they’re all working properly; obstructions can lead to excess moisture penetration and potentially lead to structural damage in the building. They should also check for any evidence of moisture inside the building, such as water stains on the ceiling or walls and peeling paint, which can also indicate a problem with the roof. Finally, they should assess the quality of the roof workmanship; if there are any obvious signs of damage or wear, such as sagging areas, they’ll need to be repaired right away to prevent more extensive and costly problems down the road.