Epoxy Flooring: Key Benefits

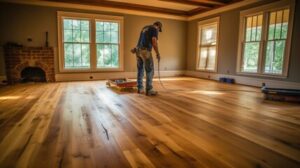
Epoxy floor coatings have long been used in garages and basements, but they are now gaining popularity in other parts of the house. Unlike carpet or vinyl, epoxy can hold up to heavy traffic and can be customized for a polished look.

Epoxy Flooring

It can also be enhanced with slip-resistant additives and decorative flakes for safety and visual appeal. Visit https://www.surfaceprosepoxy.com/ to learn more.

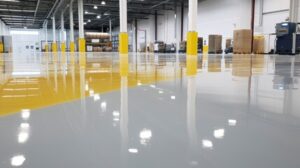
Epoxy is an exceptionally hard, plastic-like substance that resists chemical spills, heavy foot traffic, impact and abrasion. It’s also fire-resistant, water-tight, and heat resistant. This type of flooring is highly effective in industrial settings that demand a durable, sturdy floor surface.

Its ability to be customised with various safety features makes it ideal for factory floors. Many factories feature sensitive machinery that requires anti-static or ESD epoxy, which prevents static electricity build-up from causing dangerous shocks. The customisable properties of the epoxy also enable businesses to mark out walkways and zones on the floor, ensuring established safety protocols are followed.

In addition, a new epoxy coating can last longer than tile, sheet and plank flooring systems. This is due to the fact that seamless poured epoxy is devoid of weak seams found in tile and sheet flooring, as well as the welded edges on plank floors that often break down over time.

When working with or around uncured epoxy solutions, it’s important to wear protective equipment including a face mask, gloves and eye protection. The vapors that are emitted during the curing process, as well as the dust created, can be hazardous to your health and must be avoided. If the solution gets on your skin, it must be washed off immediately with running water and soap.

After an epoxy flooring system is installed, it should be regularly inspected and resealed as needed to keep it looking good and performing well. The resealing process involves cleaning the surface, applying an epoxy primer and then using a roller to apply the epoxy coating. The concrete must be completely dry before the primer can be applied, so a professional should always test the concrete to ensure it is ready for the epoxy coating.

When it comes to commercial and industrial flooring, epoxy is a great choice. Not only is it beautiful, but it also offers a wide range of safety features that can make a workplace safe for employees. The installation of epoxy also provides an opportunity to show that a business is committed to safety and sustainability, making it a more attractive place for potential customers and employees to visit.

Durability

Epoxy is renowned for its durability, protecting floors against impact damage and chemical spills. These floors can also withstand heavy traffic and forklift use, making them ideal for commercial environments. Its chemical resistance and seamless installation eliminate the need for regular maintenance and repairs, saving businesses time and money.

However, the longevity of epoxy flooring depends on the conditions and environment it is installed in. For example, a floor that is exposed to constant foot and machinery traffic will wear down faster than one that is used only for storage purposes. Also, epoxy can be sensitive to temperature fluctuations and humidity levels during the curing process. Fortunately, these problems can be avoided by working with epoxy specialists who understand how these factors affect the performance of epoxy coatings.

The durability of epoxy can also be improved with preventive measures and regular maintenance. For instance, walk-off mats at entryways can help to eliminate dirt and moisture before it has a chance to etch into the concrete surface. Also, a thorough cleaning of the concrete surface prior to applying the epoxy coating will help to ensure that it adheres and cures properly. Using non-slip additives and avoiding the use of harsh chemicals and abrasive tools will also increase the lifespan of epoxy floors.

Moreover, epoxy coatings can be customized to suit specific aesthetic preferences. For example, decorative flakes can be added to the epoxy mixture to create an attractive and interesting visual effect. Additionally, they can even be colored to match a company’s branding or to create a particular atmosphere in a space.

The most important factor to consider when installing an epoxy coating is proper preparation of the substrate. This involves cleaning the surface extensively to remove any oils or grease, removing any cracks or chips, and grinding uneven surfaces to level them. Once the concrete is prepared, the epoxy mixture can be applied to the surface with rollers or squeegees, depending on the manufacturer’s instructions. In addition, the coating should be left to cure according to the manufacturer’s specifications for maximum durability.

Aesthetics

Epoxy floors offer a sleek and modern aesthetic that enhances the visual appeal of homes and businesses. In addition, their seamless application eliminates cracks and crevices where dirt and bacteria can collect. This contributes to the hygiene of the floor, and it also adds a polished and refined look that is perfect for high-traffic areas. Furthermore, epoxy is available in a variety of colors and finishes to suit various design preferences, making it a versatile flooring solution.

Because of their highly resistant structure, epoxy floors can withstand continuous exposure to harsh chemicals without becoming compromised or damaged in any way. This makes them ideal for a wide range of industrial and commercial spaces, including warehouses and manufacturing plants. Additionally, some epoxy coatings are customizable and can be enhanced with slip-resistant additives to improve traction on the floor.

Compared to traditional flooring options, epoxy floors are more affordable and require less maintenance. They can also be installed over existing concrete, which saves installation costs and time. Lastly, epoxy flooring is easy to clean and does not require waxing, which further reduces cleaning and maintenance costs.

The durability of epoxy floors can help to increase the value of a home or business, making them an excellent investment. In addition, the attractive aesthetics of the flooring can also attract potential homebuyers or customers to a business. Moreover, the ease of cleaning and maintenance can also save a company money in the long run by decreasing cleaning and repair costs.

An epoxy resin floor is a polymer composite that is formulated with a precise mixture of hardener and resin. During the chemical reaction, the hardener creates an epoxy-bonded material that is extremely durable and strong. It can withstand the constant impact of heavy machinery and vehicles, making it ideal for busy warehouses or other high-traffic spaces.

An epoxy resin floor is also a good choice for garages because it can withstand the impact of vehicles and furniture. It can also resist stains and other damaging chemicals, making it easy to maintain. It can be easily cleaned with a broom or mechanical sweeper, and it requires no waxing.

Maintenance

While epoxy floors can withstand quite a bit of wear and tear, they do require maintenance to keep them looking good and functioning well. This is especially true in areas that are subject to frequent influxes of people and machinery.

Regular sweeping and cleaning keep the surface free of small debris particles that can scratch or damage the epoxy. A simple broom or dust mop used with warm water is the best way to clean these surfaces, and it’s important to use a pH-neutral cleaner. In addition, spills should be cleaned promptly to prevent staining and other types of damage to the concrete.

It’s also important to consider the environmental variables that can impact an epoxy flooring system, such as sunlight, humidity, and temperature fluctuations. Proper protection measures can help mitigate these factors, and choosing an epoxy coating variant that is designed to resist a specific type of chemical is a smart move for facilities that are likely to encounter spills or chemicals.

Other maintenance steps include inspecting the seals and joints to ensure they’re intact, and using a repair kit to address minor flaws and cracks. For more extensive repairs, it’s a good idea to consult with a professional, as they have the knowledge and expertise to handle these tasks in a safe and effective manner.

Finally, it’s a good idea to install floor mats at entrances to trap dirt and grit from being tracked into the facility. This will help to prolong the life of the flooring, while ensuring a sanitary and clean environment for workers and customers. Other protective measures that can be taken include placing furniture pads under heavy equipment or furniture to protect against scratches, and using a pressure washer on a low setting to periodically give the epoxy flooring a thorough cleaning. Taking these measures will help to maintain the longevity and durability of your epoxy floors, saving you from the cost and hassle of replacing these high-quality flooring solutions in the future. If you’d like more information about the benefits of epoxy flooring and how to incorporate it into your commercial space, contact us for a consultation.

Why Install a Tankless Water Heater?

Nothing ruins your day like running out of hot water. If your current water heater is not keeping up with your household’s needs, it might be time to install Denver Tankless Water Heater.

Water Heater

Tankless models don’t require storage tanks, but they do need a gas line and a power source. Read on to learn more about how they work.

A Tankless Water Heater costs more to install than a conventional tank model, but the higher purchase price is offset by energy savings and rebates from utility companies and governments. The cost of installation depends on the size and location of the system, whether it is gas or electric, and if there are any upgrades required for power, ventilation, or plumbing. Having a top-rated professional to handle the project is also essential. Labor makes up the majority of costs at $45 to $200 per hour, while materials make up the other half.

The tankless unit itself makes up 40% to 45% of the total project costs. The rest of the total project cost is for installation labor, supplies, and permits. If homeowners choose to install a condensing model, it can add another 50% to the initial cost of the water heater. Non-condensing units, which vent hot exhaust gases out a duct outside the home, are cheaper but have a greater environmental impact and lower energy efficiency ratings.

Some models include a built-in recirculation pump to provide instant hot water, which can reduce wait time from minutes to seconds. These pumps can be activated via a button, sensor, app, or voice-activated smart devices. They can be expensive to operate, however, consuming up to $50 worth of electricity per hour.

Gas and propane tankless water heaters have a higher initial price tag than electric models, but their high efficiency ratings qualify them for a $300 federal tax credit. Choosing a model that uses an alternative fuel, like natural gas or solar, can help cut upfront expenses by another $500.

Storage tank types have a lower initial cost than tankless varieties, but they have a shorter lifespan and require frequent maintenance and repairs. They also need to be refilled with fresh water regularly, which adds up to their overall cost.

Some homeowners opt for a hybrid or all-electric model, which can save on energy costs by heating water only when it is needed. However, this can result in a limited supply of hot water at any given time. If multiple people in the home are using showers and running laundry at the same time, it may take some time for the system to keep up with demand and resupply the hot water.

Limited Hot Water

During normal operation, a tankless water heater will heat only the amount of water needed to reach the set temperature. The amount of hot water available will depend on a number of factors, including the size of your home, the temperature of the incoming water and the location of the heater.

When you turn on a tap, the flow sensor sends a signal to the heater to start heating water. This triggers the combustion process if you have a gas-fired unit, or a heating mechanism such as an electric element in an electric heater. The hot water is then delivered to the faucets. In a gas-fired unit, the burner ignites and burns fuel to heat the water, while a mixing valve tempers the superheated steam exiting the heat exchanger.

Once the desired temperature is reached, the unit shuts off the heating mechanism and any fans. The unit will then run in standby mode, waiting for a new demand. This can lead to some issues, such as low or intermittent water pressure, which may be caused by a leak at the heat exchanger or a problem with the thermostat.

It’s important to consult with a professional technician to make sure you’re getting the right tankless water heater for your needs. They can help you select a model that’s sized correctly for your home, based on the amount of hot water you’ll use each day. They can also ensure the system is installed in a suitable location and that it’s compatible with your existing plumbing and electrical systems.

Another issue can be cold water sandwiches. These occur when one person showers and then someone else turns on a faucet in the same room. The first showerer will have a few seconds or up to a minute of cold water while the second showerer waits for the heater to catch up.

Fortunately, there are steps that can be taken to avoid these issues, such as installing a water softener or using a descaling solution. These will reduce the risk of calcium build-up inside the heat exchanger, extending its life and increasing its performance.

Power Outages

Unlike traditional water heaters, tankless models don’t have a storage tank. As such, they rely solely on electricity to operate. In the event of a power outage, these systems will stop working, leaving you without hot water for showering and cooking. However, there are a few solutions that can help with this problem. One option is to invest in a battery backup system. This is typically used with computers and will provide enough power to keep the water heater running for 20-40 minutes in an emergency.

Another option is to look into getting a natural gas tankless water heater with a built-in generator. These models will be able to supply you with hot water during a power outage, even if your entire house is without power. However, these units are expensive and require professional installation and maintenance.

It is also important to be mindful of how much hot water you use during a power outage. You can minimize your water usage by turning off non-essential appliances and using power-saving modes. This will help extend the duration of your backup system and save you money in the long run.

A power outage can damage your plumbing system by causing water pressure to drop. This can lead to leaks or frozen pipes. This is particularly true if you live in an area that experiences frequent power outages.

In some cases, a tankless water heater may experience problems after a power outage. It could stop working completely or start making strange noises. If this happens, it is important to check the circuit breaker to ensure it has not flipped to off. If the water heater is not resetting properly, it should be professionally repaired.

A Battery Backup System for a Tankless Water Heater can be a great solution to the issue of losing hot water during power outages. However, it is important to find the right model for your needs and consult a professional for proper installation. Additionally, it is a good idea to test your backup system regularly to ensure it is working properly.

Maintenance

A tankless water heater is a great investment for homeowners who want to save money on energy costs and have the convenience of never running out of hot water. However, just like any other appliance or system in the home, a tankless water heater requires routine maintenance to continue operating at peak efficiency. The good news is that routine maintenance is much cheaper than a costly repair bill.

There are a number of factors that can affect maintenance costs. For example, the type of materials needed can vary in price. Additionally, the cost of labor can also impact maintenance costs. For example, the labor rate for a plumber can change depending on their experience and location.

Regular maintenance includes flushing the water heater, which helps prevent sediment buildup. Sediment can clog the heat exchanger, which can affect the performance and lifespan of the water heater. In addition, flushing can help keep the water temperature consistent and reduce energy consumption.

Another common maintenance task is replacing the air filter. A clogged air filter can cause the water heater to overheat, which can lead to electrical and gas problems.

The water heater also needs to be descaled periodically. Although this process is less expensive than a full replacement, it is best left to professionals, as it can damage the heating element and other components.

It is also important to follow the manufacturer’s recommended flushing schedule. Failure to do so may void the warranty and lead to increased costs.

Other regular maintenance tasks include checking for leaks and making sure the unit is functioning properly. Performing these tasks regularly can help catch any potential issues early, which can save homeowners a lot of time and money in the long run.

Taking the time to perform these maintenance tasks is essential for the longevity of a tankless water heater. The good news is that these costs can be significantly reduced with a maintenance plan. These plans can be purchased from established plumbing companies, which offer a variety of benefits, including discounted repairs and priority scheduling. To learn more about a tankless water heater maintenance plan, contact an expert from Moore Mechanical.

Important Aspects of Roof Installation

Roof installation involves several steps. It is important to use standard roofing tools, like ladders and hard hats.

Roof Installation

Rafters or pre-fabricated trusses are hoisted into place. The sheathing is then added. A soffit and fascia protect the rafters from rain. Flashing, usually aluminum, is installed at joints such as chimneys, walls, and vents to prevent water leaks. Click Here for more details.

One of the most important aspects of roof installation is ventilation. Not only does it extend the life of the roofing material, but it also helps regulate temperature and expel excess heat in warmer months. It is also required by most building codes. Proper ventilation paired with insulation can reduce energy bills by improving air circulation and allowing the heating and cooling elements to work less efficiently.

The most common type of roof vent is a ridge vent, which is installed along the ridge of your home’s roof. It consists of a long metal sheet bent to fit the ridge of your roof, with small openings along its length. It is often topped with shingles, to ensure that it blends in with your home’s roofline. There are other types of roof vents, including gable and soffit vents. These are usually positioned near your roof’s eaves and soffits, respectively, and have louvers to keep moisture from entering your home.

If you are planning to install a roof vent, it is a good idea to hire a professional roofing expert who is licensed and insured. This will give you peace of mind that in the event something goes wrong, you will be protected. You should also ask for references before hiring a roofing expert. This will help you make a more informed decision.

Before you start installing your new roof vent, you should drive a nail into the attic to mark the location where the vent will be placed. This will prevent you from drilling through rafters or other structural components. Once you have marked the location, remove any shingles that are going to be affected by the vent. Then, install a shingle that matches the color of your roof and caulk around the hole.

Ventilation is especially important in cold climates, as it helps keep the attic cooler and protects the living space below. Without proper ventilation, warm air can leak into the attic and cause shingles to break down. It can also cause water leaks when snow melts and forms ice dams. Proper ventilation can prevent these problems by ensuring that the attic is the right temperature.

Insulation

Insulation prevents unwanted heat loss by blocking conduction and radiated heat flow. It also helps prevent air infiltration and condensation, which are both sources of water damage to a home’s interior. There are many different types of insulation to choose from, though most require professional installation unless you’re an experienced DIYer. A few options include blanket batts (which can be made of fiberglass, mineral wool or sheep’s wool), blow-in cellulose, polyester matting and foam boards.

Foam boards are rigid panels of insulation that reduce thermal resistance by reducing the gaps between structural elements such as walls, floor joists and ceiling rafters. These are useful in a variety of applications, such as exterior wall sheathing and basement walls. They’re also effective in insulating attic hatches and special application areas.

Spray-in-place foam is sprayed into place using special equipment. The type of foam used depends on the needs and preferences of the homeowner. Closed-cell foam is the most common, as it’s durable and provides better R-value than open-cell foam. However, it’s a lung and lungs irritant and requires proper safety equipment to work with.

Open-cell foam is less expensive than closed-cell foam, but it’s not as durable or resistant to rot and mold growth. It’s suitable for most residential applications, including attic hatches and special application areas.

Whether blanket batts, foam board or spray foam are used, it’s important that they cover the roof’s underside. If the underside is exposed, the shingles will leak through. To avoid this, contractors will typically roll a waterproof underlayment across the entire roof before installing the shingle layers.

When it comes to insulating your new house, you’ll want to look for the highest R-value possible. The R-value is a measurement of a material’s ability to preserve body heat, which is determined by its thermal conductivity.

The higher the R-value, the more heat it keeps in and out of a home. There are several factors that affect a home’s R-value, including the type of insulation, its thickness and its density. The most common insulation materials have R-values of about R-2.9 to R-3.8 per inch.

Materials

The roof is one of the most important aspects of a home and reflects the style and aesthetic of a house. It is essential to use high-quality materials that can withstand harsh climates and bring out the best in your home.

Before laying down the shingles, a professional will lay down an underlay membrane that acts as a waterproof barrier to protect against leaks. Traditionally, this material was treated felt or tar paper, but there are superior products on the market now. Sears Home Services uses a durable synthetic underlayment that doesn’t tear like felt and is resistant to moisture.

Next, a metal drip edge gets installed over the eaves to prevent water from seeping under the shingles and damaging the sheathing. The drip edge also helps to keep ice and snow from building up on the roof, which could lead to rot and other damage.

A ridge vent is a crucial part of a roof’s ventilation system, allowing heat to escape the attic and keep the attic cool. The vents can be metal or plastic and should be installed in a way that ensures balanced, balanced flow of air throughout the attic. A professional can help you choose the right type of ridge vent for your home.

Shingles are the most popular roofing material in the States and come in a variety of colors, styles and finishes. They are relatively inexpensive and provide great insulation, but they are not as long-lived as some other roofing materials. They also don’t do well in extreme climates and are prone to leaks.

Clay tiles are another common roofing material that provides great insulation and a classic look for your home. They are available in a range of colors and can mimic the appearance of other roofing materials, including slate and wood shakes. However, they are not as durable as other types of roofs and may require reinforcement if the home is not built to support their weight.

Finally, a standing seam metal roof is an excellent choice for areas that get frequent rain or hail and can save you money on energy bills due to its ability to reflect solar radiant heat. The installation process is fairly simple, and a professional can help you choose the right metal for your home.

Safety

Regardless of whether they’re installing new roof materials or repairing damaged ones, it’s imperative that all commercial roofing contractors follow OSHA safety standards. This includes providing employees with a comprehensive emergency action plan (EAP) for the job site, as well as training them in how to recognize and avoid hazards. Instilling a culture of workplace vigilance is also crucial for workers, as it encourages them to identify potential risks. Clear communication channels are critical to ensuring that potential problems are promptly identified and reported, which helps minimize hazards and improve safety on the jobsite.

Construction workers are at a particularly high risk for falling injuries, especially when they’re working at heights. Falling is the leading cause of death and serious injury in the construction industry, and falls from roofs account for a significant percentage of these cases. Despite rigorous fall prevention laws and inspection programs, workers continue to die from falls on the job. To prevent these dangerous accidents, employers must install a variety of fall protection systems on each roof. Some of these include safety nets and personal fall arrest systems (PFAS). PFAS typically consist of a full-body harness and a connector, which is attached to an anchor point using lanyards or lifelines. The harness distributes the forces over the body during a fall, preventing workers from reaching the ground and minimizing injuries.

Other forms of fall protection include parapets, which provide a physical barrier that keeps workers from contacting the edge of the roof. It’s essential that all roofers use these barriers, especially if the surface is uneven or they’re working on an unsecured scaffolding.

All workers should wear eye and hearing protection while on the jobsite, as well as a hard hat and rubber-soled shoes or boots. They should also be trained in how to inspect, disassemble, and use all equipment involved in their work, including ladders, fall protection systems, and scaffolding. This training should also include hazard recognition, and it’s a good idea to offer training on a regular basis for all workers as a refresher course or to address any changes in work protocols.

Patio Construction Requires Skilled Professionals

A patio provides a location for parties and relaxation. Whether it is hot summer or cold winter, it offers an outdoor location free from bugs and mosquitoes.

Patio

When building a patio with paver stones or bricks set in concrete or with other dry-laid materials, builders follow similar marking, excavation, tamping and leveling processes. Visit https://www.cleanstoneconstruction.com/ to learn more.

A patio is a great way to extend your living space into the yard and take advantage of views that may be limited by existing trees, bushes or landscape elements. However, before the patio can be built, the ground must be excavated and framed to prepare it for concrete installation. This is a critical step in any hardscaping project and requires skilled professionals to complete it safely and correctly.

Before digging, a professional will map out the location of the patio using a line level. They will then use a piece of graph paper or an online floor planning tool to create a to-scale plan of the site. Once they have finalized the design, the area is marked off and excavation begins. The excavation process will likely involve digging down to a depth of 7 inches — 3 inches for the gravel base and 4 inches for the concrete.

After the excavation is completed, a layer of loose gravel is placed on top of the soil. This is followed by a layer of sand. This provides a base for the pavers and helps to reduce shifting of the surface as it ages. A layer of mulch can also be added to the sand for aesthetic purposes.

A wood frame is constructed on the excavated site, either using 2 x 4 pressure-treated ground-contact lumber or a more flexible bender board that can be manipulated to accommodate curves in the patio design. Before the concrete is poured, the frame is soaked down with water to prevent the mix from drying out too quickly. Then, a portable cement mixer is loaded with the concrete mixture and mixed for the amount required to fill one grid unit of the patio (4 inches thick). The concrete is poured into the frame and tamped with a hand tamper or power tamper.

Sub-Base

In order to properly support a paving slab or surface, it is important that there is a layer of sub-base underneath. Whether this is for a patio or driveway, the sub-base ensures that the load of the paving is spread evenly. This will help to prevent settlement and ensure that the paving performs well.

This can be done in a number of ways, depending on the type of material used. For a patio, we usually recommend an aggregate sub-base such as crushed stone certified and guaranteed as MOT Type 1. This is a strong, stable and durable material that also drains very well, helping to prevent water pooling beneath the paving which can cause damage and make surfaces slippery.

It is recommended that any material used for a sub-base is compacted as thoroughly as possible using a machine such as a vibratory roller. This will need to be done both longitudinally and transversely, where possible, until the material is ‘tight’.

Before starting construction, it is a good idea to make a to-scale plan of the patio to ensure that it is the correct size and layout. This can be done with graph paper or an online floor planning tool and will help to eliminate any surprises once the construction begins. It is also important to consider the direction that any water runoff should go, as this will help to prevent any flooding issues later on.

Once the ‘tight’ sub-base has been completed, it is time to start construction of the patio itself. It is often best to build this as a grid of 3-foot-square units, which can be either square or rectangular. These are framed with 2 x 4’s and nailed together using 8-penny galvanized common nails.

Forms

Patios can be made from a wide variety of materials, and new trends are leaning toward incorporating patio amenities that can make the area comfortable for dining, relaxing or entertaining. For example, a built-in fire pit can provide warmth and atmosphere, while a water feature can bring tranquility. Some people choose to add a pergola for shade or an outdoor kitchen to facilitate cooking and eating outdoors.

Most standard concrete patios are built using forms to hold the concrete in place, and there are several different types of forms available for this purpose. Some types include on-site wood slab forms, manufactured metal framing for walls and foundations and newer, energy-efficient insulated concrete forms.

Before the forms are put into place, they must be anchored to the ground. This is done by staking the corners of the square with 2×4 lumber and driving 3d nails through the lumber at each stake point to ensure that the concrete form will not shift. It is also a good idea to place 1x kickers at each joint and 4-foot intervals around the outside of the forms for additional support, since concrete is very heavy.

A patio can be constructed from a number of different materials, including bricks and paving stones. A paver patio is usually constructed from a grid of 3-foot-square concrete units that are framed by 2×4 lumber. For this type of patio, a gravel base is often used, particularly in areas that experience poor drainage or freezing temperatures. The builder will work in sections, pushing the concrete into the forms and removing excess concrete with a hand trowel. He may brush the surface of the concrete with a bristle broom or trowel to produce a textured finish.

Concrete

A beautiful concrete patio can make all the difference in a backyard living space. It’s a great place to entertain friends and family, relax and unwind, or simply enjoy the outdoors with your favorite book or glass of wine. However, patio construction is a specialized type of concrete work that requires proper planning and execution to achieve the best results.

A concrete patio can add significant value to a property, as well as increase its overall curb appeal. Many homeowners choose to use concrete for their outdoor spaces because it’s durable, visually appealing, and versatile. Concrete can be molded and shaped to create a unique design, and it can also be stained or colored with pigments to produce a variety of colors and hues.

Unlike wood and composite wood, concrete is highly resistant to rotting or warping. Additionally, it can withstand heavy foot traffic and heavy patio furniture without cracking or sinking. It also doesn’t need yearly staining or refinishing, which can save homeowners time and money.

Concrete is also environmentally friendly. It can be produced from recycled materials, and it’s durable enough to last for decades. This reduces the need for frequent replacements, which contributes to lower energy consumption and fewer greenhouse gas emissions.

Whether you’re looking to transform your existing yard or create a brand new patio, concrete is a good option. KC contractors say concrete patios have a longer lifespan and require less upkeep than decks, so it’s an excellent choice for homeowners who want to spend more time enjoying their outdoor space rather than worrying about maintenance. Concrete can also be used to build other features, including raised garden beds and retaining walls.

Pavers

Pavers are paving stones that come in different shapes, sizes, and colors to fit your patio design. They can be crafted from materials like natural stone, bricks, and concrete to offer durability and enhance aesthetic appeal without requiring extensive upkeep.

They are commonly installed over a gravel base that’s been spread out and tamped down to compact the soil. A board is often laid across the area to help determine that it’s level. A geotextile cloth is sometimes placed over the tamped down soil to limit weed growth. A layer of sand is then added, typically a coarse sand that’s been screened to remove fine debris. It may also be a polymeric sand that’s coated with an agent that helps to bond the sand and prevent it from shifting in the future.

Builders often use stakes and string to outline the area of the patio in advance. This method allows the builders to see what shape and size the patio should be and how it will lay out with the rest of your garden landscape. Alternatively, builders can use a type of eco-friendly spray paint to mark the shape and size of the patio ahead of time.

Once the builders have marked the area, they’ll start laying out the pavers. They’ll usually start with the largest stones first to provide a strong foundation. They’ll then work their way down to the smaller stones. Once all of the paving stones are in place, sand or a fixing material is poured on top and then brushed into the joints between each paving stone. It’s then watered in to lock-in the stones and create a sturdy surface that can be used immediately.

Advantages of Construction Site Security Cameras

Construction Site Security Cameras are a fairly new technology that can provide multiple benefits for construction companies. In this two-part article, our Tampa construction lawyers will explore some of the key advantages of surveillance cameras on construction sites.

Security Cameras

Security systems on construction sites allow monitoring 24/7 without the cost of in-person staffing. They also reduce insurance premiums by deterring theft and vandalism.

Construction sites are bustling hubs of productivity — but they also present a tempting target for theft and vandalism. With expensive materials and machinery, multiple entry and exit points, and a large workforce, implementing security cameras is no longer a luxury for construction companies but a necessity.

A quality camera system can provide a high-definition view of the entire site, making it easy to see any suspicious activity or individuals. It can also capture license plate numbers, facilitating a swift police response in the event of an incident or theft.

Many modern security systems allow remote monitoring via a smartphone, tablet, or computer, providing a real-time snapshot of the site. This allows project managers, security personnel, or authorized individuals to assess the situation remotely and respond accordingly. This feature eliminates the need for onsite security guards, saving both time and money.

Look for a camera system with motion detection capabilities that can detect movement within the camera’s field of view, alerting you to any suspicious activities or security breaches. Choose a camera with adjustable sensitivity levels to avoid false alarms from wind-blown debris or natural movement. Look for cameras with long-range motion sensors that can detect perimeter intrusions from a significant distance, up to 1,200 feet.

An effective construction site security camera system can identify a wide range of security threats and notify appropriate personnel, minimizing the risk of theft, property damage, or safety hazards. However, it is important to thoroughly evaluate a camera system’s capabilities before investing in one.

For example, consider the site’s operating hours, including whether it is active 24/7 or if you would like to limit surveillance to specific shifts. Evaluate the size of the site, as well as how many entries and exits it has. Determine if you need a camera system with license plate recognition, night vision capabilities, and other features.

Lastly, evaluate the power options, such as solar, hardwire, and battery backup, to ensure your camera system will be able to operate in a variety of environments. Additionally, consider whether the camera system is scalable, allowing it to grow with your site’s needs over time.

Detection of Intruders

Construction equipment is valuable and expensive, and thieves know they can sell it for a lot of money on the black market. To prevent theft, construction site security cameras can help deter criminals by letting them know they are being watched. These cameras can also alert the authorities when unauthorized activity is detected and provide evidence for prosecution in the event of a crime on-site.

The best construction camera solutions feature a tamper-resistant design, preventing unauthorized individuals from disabling the cameras or even entering the area. They can be set to record footage continuously or on a schedule, and they can send instant notifications and alerts when an unauthorized individual enters the construction area. This reduces the need for constant human supervision and allows managers to take quick action when a security breach is detected.

When a camera’s AI detects an intruder on the construction site, it will trigger an alarm at the remote video monitoring center, which can take different actions depending on the situation. Some of these include voice interventions via on-site speakers, police or security team dispatch, and emergency contact notification. Some cameras can even provide real-time updates on the intruder’s location so law enforcement can stay on top of them, making it harder for them to get away with a crime.

If you are looking for a camera solution to protect your construction site, choose one with high-definition video quality. This ensures that all the details of any suspicious activity will be captured in crisp clarity, which is essential for legal proceedings or insurance claims if an incident occurs. Some camera systems also come with built-in lights and sirens, which can act as a visual deterrent for potential intruders and vandals.

Additionally, look for a camera system that features remote access and is compatible with other security or facility management systems. This makes it easy for management to monitor the construction site from a remote location and ensures that all the data is stored securely and can be accessed when needed. This can be especially useful for remote locations where a permanent presence of humans may not be possible or cost-effective.

Detection of Damage

A major issue construction sites face is damage from vandalism, burglary and theft of equipment. A security camera system that offers video analytics and 24/7 monitoring will help combat these issues. It can alert security or emergency personnel to any suspicious activity on the property. This will allow them to respond quickly and prevent crime before it happens.

In addition, a well-designed surveillance system will minimize the risk of liability lawsuits. This will be especially important in the event of accidents or property damage. A recorded incident can show exactly what occurred and will be invaluable in proving the case that an accident or act of vandalism was not caused by company workers.

Video surveillance will also help deter criminals from trespassing on the site. Thieves and vandals typically look for cameras before they break into a property, as they do not want to be caught on tape. But if they see that a construction site has a video surveillance system in place, they will be less likely to pursue their plans because they know that they can be caught.

The security systems that are designed to monitor construction sites can include smart features such as object recognition and behavior analysis. These capabilities can help identify suspects in real-time and alert security personnel, which will be much more effective than relying on record only cameras. The systems should have high-quality imaging and be able to detect faces, even in low light and fog. They should also offer various power options such as solar, hardwire and battery backup.

While all responsible construction companies adhere to strict health and safety guidelines, accidents can happen. Having video surveillance can help prove that an accident was not caused by the company and will reduce liability, insurance premiums and repair costs. Video surveillance is a cost-effective and efficient alternative to hiring a full-time security guard to patrol a construction site. It can also be used to monitor activities in remote locations. This allows the contractor to avoid the hassle and expense of travel to and from the site.

Detection of Accidents

Construction sites are dangerous environments and despite adherence to safety rules accidents occur frequently. Using video monitoring, it is possible to see unsafe conditions and immediately alert safety personnel. This helps to prevent injuries, minimize the risk of theft and damage and reduces liability for the construction company.

In addition, many security cameras for construction site are designed to work in tandem with other security and safety systems that are already set up at a job site. This means that if an unfamiliar person attempts to enter the site, security cameras can be programmed to recognize this and alert the relevant authorities. This allows the camera system to act as an extra set of eyes that never blinks.

This also provides a significant advantage in terms of employee safety. The cameras can be programmed to detect if an employee is not wearing their personal protective equipment (PPE) or if they are handling materials that pose a threat to their health. This information is then fed back to workers through the safety management system, thereby creating a more informed and safer working environment.

The most advanced construction security cameras are also capable of recognizing the presence of an individual in the field of view and triggering an alarm if they enter the scene of an accident. This can be a real lifesaver when an accident occurs and is particularly useful if it involves the movement of heavy machinery or vehicles.

Besides being able to identify people, security cameras for construction sites can also use advanced AI technology to recognize the most common objects and movements on a site. This can dramatically reduce the number of false alarms generated by things like small animals, windblown debris or shadows. In addition, some cameras feature speed filters that are able to differentiate between regular movement and someone running suspiciously.

When choosing a security camera for a construction site, consider factors such as image quality, night vision capabilities, weather resistance and remote monitoring. In addition, choose a provider that offers support services and technical assistance. In this way, you can be sure that your camera system will perform optimally for the entire duration of your project.

What Does a General Contractor Do?

GCs oversee all aspects of construction projects and are responsible for the day-to-day operations of the project. They ensure that needed materials arrive on site and that each phase of a home project is completed correctly, efficiently and on schedule.

Getting started in this industry requires the right education and field experience. Obtaining licensure varies by location and can take several months to a year or more. For more information, Click Here to proceed.

In project planning, a general contractor works with his team to determine what needs to be done and how it will be accomplished. This includes establishing who will be responsible for specific aspects of the project, such as a construction manager or an assistant general manager. It also involves determining what tools are needed to accomplish the project and how they will be managed. Developing a detailed work breakdown structure is important in project planning, as it allows all involved parties to see the scope of each task and who will be doing what.

Project planning is essential to ensuring a project can be completed on time and within budget. Often, this is achieved by identifying key project milestones and creating a schedule that can be used to track progress. It is also crucial to determine what steps must be taken to avoid unforeseen costs or delays and how these can be mitigated. This may involve establishing a contingency plan or working with the design team to identify potential risks.

A general contractor is familiar with all aspects of a construction project, including its structural, electrical, mechanical, and finishing plans. They must have a strong understanding of how each part fits together to ensure the building is safe, durable, and meets all required specifications.

During the project planning process, a general contractor will often create a charter document that defines the objectives, stakeholders, and scope of the project. This document can be referred to as the “gospel” of the project and is critical to its success.

The general contractor is also responsible for obtaining a permit to begin construction and coordinating with the owner, architect, and engineer during the engineering design phase. Once the engineering design is complete, the project manager will prepare a contract for the construction of the building. This is usually accomplished through a competitive bidding or negotiation process.

While the general contractor is in charge of project planning, they must rely on the expertise and experience of the superintendents, specialty contractors and subcontractors to actually perform the work. In many cases, this work is performed by unionized craftsmen and laborers who are governed by collective bargaining agreements. Therefore, the general contractor must be able to negotiate with the various tradespeople and craft laborers on the jobsite and encourage cooperation and collaboration.

Contract Negotiation

Construction contracts are complex legal documents with many different clauses. It is the job of a General Contractor to negotiate fair and equitable agreement terms that benefit all parties involved in the project. Contract negotiation often involves the use of dispute resolution processes such as arbitration, mediation and litigation.

General contractors also play a critical role in project budgeting, working with architects and clients to develop and approve design plans that are both cost effective and meet building codes and specifications. They will then manage the project to completion, sourcing materials and equipment; hiring subcontractors; overseeing their work; obtaining the necessary permits; and ensuring all project costs are monitored closely.

When it comes to bidding, most GCs are familiar with the concept of “winning the bid” by offering the lowest price they can while still covering their costs and turning a profit. While this approach may seem like it leaves little room for negotiations, it’s important to remember that the old saying “you get what you pay for” applies just as much to construction projects.

The key to successful contract negotiation is understanding what each party needs from the project. For example, project owners want quality construction that meets their budget and schedule. General contractors want fair agreements with their clients and subcontractors that provide a safe environment in which to work, meet payment terms, and define the scope of work.

Negotiation techniques vary by person, but some general principles to consider include: understanding that each person’s perspective is legitimate; learning how to listen actively; focusing on what matters most to you; and avoiding confrontation. It’s also important to remember that the other person is a human being, and their emotions will play into the negotiation process as well.

Additionally, negotiating with contractors should always be done in good faith, with an open mind and a desire to find solutions that benefit all parties. Lastly, it’s important to carefully review insurance policies, especially those of subcontractors, as they frequently don’t adequately cover all risks and have limited limits of liability. The ability to identify these potential issues before a dispute arises can save both parties time and money.

Subcontractor Management

One of the key functions of GCs is managing subcontractors, and it is an ongoing process that extends well beyond project completion. GCs must select the right subcontractors, ensure that contractual agreements are adhered to, communicate effectively with them, and ensure the quality of work is up to standard.

This can be a complex task, especially in large projects where the GC oversees multiple teams of subcontractors. GCs must coordinate with each team to provide accurate information, schedules, and timelines, and also ensure that the work being performed is consistent with the architectural design and blueprints. Additionally, a GC is responsible for coordinating and providing utilities on the construction site, maintaining safety in the workplace, and performing engineering functions.

When selecting subcontractors, a GC considers the specialized skills and expertise they offer, as well as their track record on similar projects. They also consider how they fit into the overall project plan and budget, as well as any legal compliance issues. For example, in most jurisdictions it is necessary for workers to have a valid work permit, and the GC must ensure all workers are properly documented before they can start working on the jobsite.

GCs must ensure that contractual agreements are adhered to by both the GC and the subcontractor. This is often done through written contracts that include detailed delivery expectations, scope of work, and payment terms. GCs also communicate clearly with subcontractors throughout the project to ensure all parties are on the same page and to resolve any conflicts quickly. This is facilitated through regular meetings, daily jobsite huddles, and other forms of communication between the GC and subcontractors.

Effective subcontractor management is crucial for a successful project. GCs can leverage their experience and expertise to ensure that all aspects of the project are coordinated and executed correctly. This helps to minimize costs, increase speed, and ultimately deliver high-quality results. For example, a GC can identify the best way to get materials to the jobsite, help to avoid schedule delays due to weather or material shortages, and keep rework rates low by ensuring that all stakeholders are on the same page.

Site Management

As the name suggests, site management is the day-to-day work on the construction project. It requires the morale-boosting talents of HR managers and the planning smarts of general managers. Essentially, site managers do what is necessary to keep the building project on track and within budget.

Among these tasks are obtaining permits, providing temporary utilities on site, managing the removal and disposal of construction waste, and monitoring schedules and cash flow. They also communicate with the project owner, architect, and design team about construction challenges or changes to the scope of work.

Strategically selecting subcontractor partners is a major part of site management, as this has a significant impact on project outcomes. General contractors often compile a roster of pre-qualified specialty contractors to choose from, assessing their past performance, safety ratings, references, experience and financial stability. They also review each contractor’s proposed plans for executing the specialized scope of work to ensure that they are consistent with established best practices.

The success of the construction process relies on a united, skilled onsite crew. To this end, an effective site manager recognizes the value of a cohesive team and invests time upfront aligning them around common goals, values, and expectations. They also foster open communication, cooperation, and transparency in decision-making, as well as promoting a safe and healthy workplace.

Finally, an effective site manager is constantly looking for ways to improve productivity. They use their understanding of prevailing building methodologies to maximize production and minimize costly delays. They also develop strategies for improving the efficiency of equipment and processes, reducing downtime and the impact on the overall timeline.

If you have the grit and determination to become a successful construction site manager, you can progress into more senior roles such as contract management or project consultancy. You can also specialise in areas such as estimating, health and safety, or building inspection. Alternatively, you could apply to become chartered through an industry body such as the Chartered Institute of Building. This will enhance your prospects even further.

The Benefits of an Asphalt Driveway

Asphalt driveways can be extremely durable when they are properly maintained and sealed. Keeping a regular schedule of cleaning, removing snow, and not using de-icing salts will help to prevent damage and prolong the lifespan of your asphalt driveway.

Asphalt Driveway

Additionally, choosing the right type of asphalt for your driveway is essential. Choosing a professional contractor to install your asphalt will also make it last longer.

Asphalt is a popular material for driveways, but the cost of installation can be high. The price depends on the location of your home, the size of your driveway, and whether it’s a new or replacement driveway. In addition to the cost of the materials, you’ll need to budget for labor costs. These can run between $5 and $7 per square foot for standard asphalt.

Asphalt usually contains recycled material, which helps keep the cost down compared to other materials. Hot mix asphalt is a common choice for residential driveways and costs between $1 and $3 per square foot. You can also choose porous asphalt, which uses a layer of crushed stone to minimize runoff and improve drainage. Porous asphalt typically costs $8 to $15 per square foot.

An asphalt driveway can be a great investment for your property. It adds curb appeal and increases the value of your home. In addition, it’s easy to repair and maintain. A properly maintained asphalt driveway can last up to 20 years or more. However, you should consider resurfacing your driveway every three to five years to prevent cracking and other problems.

If you’re installing a new asphalt driveway, the first step is to remove the existing one. This can be done with a jackhammer if you’re comfortable working with machinery. If you hire a contractor to do the work, ask about their experience with this type of project. This will help you avoid miscommunication and save money in the long run.

The next step is to prepare the site for laying down the asphalt. This includes removing any rocks or debris. A base layer is then put down, followed by the asphalt itself. The final step is to apply a sealant for protection. You can expect to spend between $2,880 and $4,030 for a two-car asphalt driveway.

It’s best to enlist the services of an experienced asphalt contractor when installing a new driveway. This will ensure that the process is completed correctly and in a timely manner. It’s also important to make sure the contractor has the proper machinery and equipment for the job. Do-it-yourself projects can be dangerous and time consuming, especially when dealing with heated asphalt.

Durability

Asphalt driveways can last as long as 30 years, if you take good care of them. That’s an incredibly long lifespan compared to concrete, which may crack under the stress of cold weather and water damage. Asphalt is a mix of crushed stones and sand that gets mixed and poured at high temperatures. This allows it to withstand the harsh winters of Minnesota and Wisconsin, as well as any precipitation that might come along.

The average asphalt driveway will develop some cracks as it ages, but these are usually minor and can be repaired easily. If you keep up with routine maintenance, such as resealing and patching, your asphalt driveway will last longer.

Regular sweeping and blowing can also help keep organic materials, such as leaves and pine needles, from building up on your asphalt. This can also prevent debris from settling on and damaging the surface, which will extend its lifespan. The color of asphalt is naturally dark, which helps to hide stains and dirt that can mar the appearance of concrete surfaces.

Another factor that impacts the longevity of an asphalt driveway is how much traffic it receives. While a three-inch layer of asphalt can support the weight of most sedans and trucks, heavy vehicles will prematurely deteriorate the surface where their wheels travel. If your driveway will see a lot of heavy vehicles, consider getting it laid at least five inches thick.

If you choose to use recycled asphalt, it can be every bit as durable as a hot mix asphalt driveway and can limit the amount of petroleum products in your local landfills. It is also cheaper to install and can be a great choice for those on a tight budget.

The most significant challenge to an asphalt driveway’s lifespan is the weather. Freeze-thaw cycles can cause serious damage to both concrete and asphalt, and they both lose strength if they are subjected to repeated ice and salt exposure. If you live in an area with extreme weather, it’s worth investing in a quality concrete driveway instead of an asphalt one.

Appearance

Asphalt driveways look sleek and stylish after they are installed. Their dark color and consistent texture help them stand out from their concrete counterparts, making them a more desirable choice for homeowners who want their driveways to add curb appeal to their homes. They are also less prone to staining from oil spills and other chemicals. Asphalt is also more flexible than concrete, which makes it easier to drive on and prevents cracking and settling over time.

When properly cared for, asphalt can last a long time. Its lifespan can be further extended by using innovative drainage solutions, which ensure that water does not pool in the driveway and erode the base materials underneath. However, if your pavement begins to crack and settle over time, it will need to be repaired with an asphalt patch. This repair will only be a temporary solution to the problem, and it is not as effective as a full-scale renovation.

Once the pavement is cracked, weeds and other forms of vegetation can thrive in the resulting holes and potholes. They may even start to grow in the cracks, further compromising the structural integrity of your driveway. This is why it is important to hire a reputable professional who uses high-quality paving materials and implements best practices for asphalt installation.

In addition to preventing weeds and other vegetation from growing, a quality asphalt installation will include a thorough base material preparation process. This involves the removal and modification of existing materials, such as gravel and sand, and compaction to create a strong, solid foundation. A proper base will increase the longevity of your asphalt and ensure that it can withstand freezing and thawing cycles.

As the asphalt ages, it will begin to lose its deep black appearance and become gray, flaky and stony in texture. This is due to the bitumen that holds the aggregates together drying out and eroding. This is known as oxidation, and it is a normal part of the aging process for any type of pavement. If your driveway is gray in color within the first twelve months after paving, there is a serious issue that needs to be addressed right away.

Maintenance

Asphalt is a durable material that will last for years if it’s properly maintained. Regular inspections, cleaning, crack filling and repair work can lengthen the lifespan of your driveway and keep it looking attractive.

The most important maintenance task is keeping the asphalt surface free from debris. This should be done regularly by sweeping or using a power hose spray to remove dirt, tree leaves and other items that can scratch the surface.

Oil and gasoline spills can also cause damage if they’re not attended to immediately. These liquids dissolve the asphalt binders and can leave behind permanent damage if not cleaned up promptly. It is recommended that you use a grease removing detergent that’s safe for asphalt surfaces when cleaning spills.

Other factors that can damage asphalt include water intrusion into the base and freezing-thawing cycles. These problems can lead to the failure of the entire driveway.

To prevent these problems, you should have your asphalt driveway sealed every couple of years. This protects the surface from water penetration and can reduce the number of potholes that may develop. Additionally, it is a good idea to limit the amount of de-icing chemicals that you use. These chemicals can deteriorate the asphalt surface and damage your vehicle’s tires.

Another way to protect your asphalt is by building up the soil near its edges. This allows for proper drainage and grass growth, which will help support the asphalt and minimize cracking.

Taking the time to inspect your asphalt driveway on a monthly basis will help you catch any potential problems before they become major issues. It is also a good idea to inspect it after extreme weather events, such as heavy rain or snowfall. This will help you spot any cracks, potholes or other signs of wear that you might not have noticed otherwise.

If your asphalt driveway is new, you should take care not to drive or walk on it for the first 24 hours after installation. During this time, the surface needs to cure properly. You should also put up barricades or warning tape to keep vehicles and pedestrians off the new asphalt until it dries completely.

How to Evaluate Paint Contractors

When evaluating painting contractors, be sure to examine the labor breakdowns in their quotes. Other important aspects include content brands and a complete surface preparation description.

In addition, customers should ask for a written warranty. This can provide peace of mind in the event something goes wrong after a painting project is completed.

While some home improvement projects are clearly do-it-yourself jobs, there are others that require a professional with the right skills and equipment. Painting is one of those tasks. Some paint contractors are part of the construction industry while others work with residential and commercial clients who need their services to add a finishing touch to their building, remodeling or renovation project.

When you’re selecting a painting contractor to handle your job, it’s important to choose one that is well-established and has a solid track record. A professional painter should be accredited and have a good reputation for quality workmanship. You should also be able to find testimonials and references from their previous clients. You should also be able to contact the painter easily – if they’re difficult to reach, that’s probably not a good sign.

Professional painters typically follow a specific process to ensure that the project runs smoothly from start to finish. They begin by meeting with the client and discussing the project requirements, goals and preferences. Then they’ll provide a cost estimate and schedule a start date.

In addition to a clear process and timeline, the contract should detail all costs involved in the project, including labor and materials. This will help avoid any miscommunication and confusion about what’s included and what’s not.

Another thing to look for in a painter is their ability to work with your budget. Many painters offer a range of pricing options, including per room and flat rate. The average price for interior painting is between $2 to $6 per square foot, which usually includes two coats of paint.

You should always get multiple bids before choosing a painter to make sure you’re getting the best price. It’s also a good idea to ask about extra services that they might offer, such as power washing or carpentry work that may be required to prepare the surface before painting. This can save you time and money in the long run.

If you are going to hire a paint contractor, you want one that has years of experience. This will ensure that they have the skills to handle any situation that may arise during your project. It will also ensure that your job is completed on time and within budget. In addition, a professional painter will be familiar with the latest products and techniques. A good way to gauge a painter’s experience is by looking at their track record and testimonials from previous customers.

Another important quality to look for in a painting contractor is honesty. You want someone who will give you an accurate quote and won’t try to take advantage of you. This is particularly important since they will be working in your home or office and will have access to your personal belongings. You can usually tell if a painter is honest from their quotes, as most of them will not risk their reputation or financial ramifications by lying to you.

Aside from the above qualities, you also want to make sure that your painter is licensed and insured. This is essential because if something goes wrong during the project, you will be covered. It is also a good idea to choose a painting contractor that offers a warranty on their work.

While a painting license is not required in most states, it is a good idea to get one. This will help you avoid any legal issues and ensure that you are providing a high-quality service. Licensing requirements vary from state to state, but they typically include passing a state exam and showing proof of financial stability. In addition, you should also obtain liability insurance and workers’ compensation coverage.

When selecting a painter, you should always ask for a price quote and a description of the scope of the project. You should also ask for a list of the materials that will be used and payment terms. It is also a good idea to find out whether the painter has any special certifications or training. For example, if you are painting an oil-based surface, you should make sure that the painter is trained in using the correct safety equipment.

When you hire a Paint Contractors, you want to be sure they are insured and carry all the proper business insurances. This is an important part of their credentials, and it gives you the peace of mind knowing that you are protected in case something goes wrong on the job.

Many painting contractors need general liability, workers’ compensation, and tools & equipment coverage. This insurance protects the business from claims related to third-party bodily injury and property damage, as well as libel and slander. The cost of this type of insurance varies depending on the size and location of the business. For example, a large paint depot that has a lot of inventory is at greater risk for theft than a small painting company that only carries supplies in a truck or trailer.

A reputable painting contractor will be happy to provide you with proof of their insurance policies. This is a great way to filter out those companies that do not have the required insurances. It is also a sign of integrity, as they care about protecting their customers and themselves.

If you hire a company that does not have the necessary insurance, you could be left with a huge bill for damages or injuries that occurred on your property. This is a headache you do not want to deal with, and it is best to avoid such scenarios altogether by hiring a painting contractor that has the proper insurance coverage.

You may also want to consider a business owners policy, which is an all-in-one insurance package that includes both liability and property coverage. This is usually cheaper than buying individual policies separately. Ask your painter to provide you with a copy of their certificate of insurance and review it carefully. Look specifically for a checkmark next to “workers’ compensation,” which ensures that the employees are covered in case of an accident on the job.

In addition to checking for a valid license and insurance, you should also ask your painting contractor about their experience in the industry. They should be able to provide you with references from past projects and explain the different processes used during each step of the project. This is a good way to gauge their knowledge of various methods and styles of painting, as well as the level of expertise they have.

While many painting contractors claim to offer a warranty, it’s important to find one that actually stands behind their work and offers real protection. Look for a paint contractor with a long history in the community and good reviews. It’s also a good idea to talk to the company about how they handle warranty issues.

A reputable paint contractor should understand the importance of proper surface preparation and application. They will not cut corners or skip steps in the painting process to save time and money. They will also be able to advise you on the best type of paint for your home’s unique requirements.

Painting companies with poor workmanship can cause serious problems for their customers. They may use low-quality materials or cut corners on the job site, resulting in problems such as premature chipping and peeling. These issues can be extremely frustrating for homeowners, especially if they were expecting a high-quality finish. Fortunately, if you hire a professional painting company, you can rest assured that the job will be done right the first time.

It’s also important to choose a contractor that offers a paint warranty that covers both labor and materials. This is particularly important because paint problems can occur at any time, even after the job has been completed. Look for a warranty that lasts at least a year, and be sure to read the fine print to ensure you’re covered in the event of any issues.

The paint warranty should clearly state what is and isn’t covered by the paint. Some paint manufacturers offer warranties that cover the performance, durability, and characteristics of their paints. You should also check to see if the warranty is transferable to future owners of your property.

Having a strong warranty can help you build trust with your clients and earn their loyalty. In addition, it can protect you from a lawsuit if the client is unsatisfied with the results of your work.

Some painting companies try to avoid offering a warranty because it costs them more in overhead expenses. They may choose to pay their workers less and forego things like social security contributions, unemployment insurance, and worker’s compensation policies. In some cases, they also choose to skimp on safety precautions, leading to injuries and accidents on the job site. Additionally, they may choose to only offer a short warranty in order to keep their prices competitive.

Hardwood Floor Refinishing Vs Resurfacing

Hardwood floor refinishing can dramatically change the look and feel of hardwood floors. However, there is a lot to consider when deciding whether refinishing or resurfacing is the right option for your home.

Hardwood Floor Refinishing

Board repair is a key element of refinishing and is done to ensure the integrity of the floor. It is also important to properly stain and seal the wood as different woods respond differently to stains and finishes.

When refinishing hardwood floors, it is vital that the process is done correctly. A professional will ensure that the floor is evenly sanded, and will remove only the top layer of wood. This will make sure the new finish adheres properly and will not peel away in the future. The sanding stage is very messy and time consuming, and it is often better to hire a professional than attempt to do the work yourself.

Before sanding begins, it is important that all furniture be moved out of the room. This will prevent dust from settling inside the home and contaminating the furniture. The floor should also be swept and vacuumed to remove any dirt or debris. The floor should be inspected for protruding nails, which should be hammered down or removed before sanding. It is also necessary to check that all heat grates are properly covered, so that the sanding process does not damage them. It is also a good idea to cover the HVAC vents, in order to keep dust from blowing through the house.

A large drum sander will be used to sand down the entire surface of the floor, starting with coarse grit sandpaper and working through finer grits until the floor is smooth. If any scratches, dents or gouges are left behind, these can be filled with wood putty and sanded once again until smooth. After sanding, it is recommended that the floor be cleaned again, using a cleaner that will not leave any residue. This is an important step because any dirt or residue will be magnified once the stain is applied.

If you have chosen to stain your refinished hardwood floors, it is important that the stain be allowed to dry completely before being put back in place. During this time, it is best to have everyone wear slippers or socks in the house to avoid tracking up the freshly sanded surfaces.

A final buff with a buffer or sander will be needed to even out the surface and give the floor its finished look. Staining can be done to enhance the natural wood grain, change the color of the floor, or to match a new piece of furniture. A minimum of three coats should be applied, with proper drying and curing times between each application.

Staining

Staining is the process of coloring wood. When done correctly, it adds depth and visual interest to your floors. It can also help conceal minor water or pet stains that may have accumulated over time. However, staining is not an effective fix for severe stains or scratches, which should be addressed by sanding and repairing the damage.

When staining, it’s important to follow the grain of the wood. This will create a more consistent appearance and prevent the color from pooling in the corners or on the edges of the boards. It’s also important to test the stain in a small area before applying it to the entire floor. You’ll want to choose a low-VOC, oil-based stain with a tinting base that allows you to adjust the color.

After the stain has dried, you can apply a polyurethane sealer to protect the finish and give your hardwood floors a beautiful shine. A flooring professional will be able to recommend the right type of sealant for your floors based on your lifestyle and aesthetic preferences.

A good quality polyurethane will last for years, but it’s important to allow it to dry completely between coats. You should also wait for several days before moving furniture back into the room. This will help prevent dents and scratches.

Before the refinishing process begins, you’ll need to clear out the room and remove any furniture or rugs. It’s also important to cover any vents and baseboards with plastic sheeting or painter’s tape. You’ll also need to protect any areas of the home that you don’t want covered with stain or polyurethane.

If you’re planning on refinishing your hardwood floors, be sure to gather all of the necessary tools and supplies. It’s also a good idea to make a checklist of all of the steps in the refinishing process. This will ensure that all of the steps are completed properly and in a timely manner. It’s also a good idea for homeowners to wear a dust mask when working with a wood sander. This will help prevent any respiratory problems.

Sealing

Once the floor is completely sanded, it’s ready for staining. The sanding process will likely remove most, if not all, of the original stain, so a new coat will have to be applied before sealing. It’s important to use a penetrating stain to keep the original appearance of the wood intact. A professional will know what products to use and how many coats are required for a perfect result.

After sanding and staining, the final step is applying a sealant to protect the hardwood floors. Sealants come in a variety of finishes, including polyurethane, linseed oil, and wax. Each type of sealant has its own benefits, but all provide a protective layer that helps prevent stains and scratches.

Water-based polyurethane is the most popular finish for hardwood flooring, as it’s easy to apply and quick to dry. This sealant gives the floor a beautiful sheen and is very durable. It also resists scuff marks and dirt, making it very easy to clean.

Before sealing, it’s a good idea to do a smell test. If the product has a strong odor, it may take longer for it to dry. Also, it’s recommended to open a window in the room where you’re working to help with the ventilation process.

While it might be tempting to tackle this project yourself, a reputable hardwood floor contractor will have the right equipment and training to ensure a quality result. DIY refinishing can lead to uneven finishes, misapplication of the sealant, and other problems. Professionals use specialized equipment and application techniques that they’ve honed over years of experience.

Properly sealing your wood floors will protect them from damage and increase their value over the life of your home. It’s a small investment that will pay dividends for decades to come. When done correctly, it will minimize costly repairs, replacements, and refinishing jobs in the future. A well-maintained floor will also make your home more attractive and easier to sell. In addition, a pristine floor will improve the air quality in your home and contribute to your family’s overall health.

Cleaning

Whether you have solid, engineered, or reclaimed hardwood floors, they need regular care to keep them lustrous. To do this, homeowners typically use a vacuum with a hard floor attachment, mop, or clean cloth. Using water or vinegar on your wood floors is not recommended, because the acid can degrade the finish and damage the wood underneath. To find out how to clean your hardwood floors properly, Design Addict turned to Mark Whatley, production manager at Bay Area showroom and contracting company Amber Flooring; and Tommy Sancic, owner of Olde Wood, a custom antique reclaimed and wide plank flooring manufacturer in Magnolia, Ohio.

A good hardwood floor should be swept regularly to remove dirt, dust, and pet hair. While it may seem like a pain, this simple step prevents the buildup of these particles that can dull and scratch the surface. It’s also essential to vacuum frequently and to clean up spills, as these can stain or scuff the floor.

When a hardwood floor is damaged, it can be refinished by sanding and applying a new coat of finish. This process can be time consuming and labor intensive, but it is a much less expensive option than refinishing to bare wood.

To sand a hardwood floor, the contractor will use a drum sander or hand sand the boards to smooth them. Depending on the condition of the floor, this process can take up to a day. After the sanding is complete, the floor needs to be cleaned thoroughly and buffed (to allow for adhesion of the new finish) before a new coat can be applied.

The stain and varnish that is used to protect your wood floors comes in many colors, finishes, and types. Your flooring professional can help you choose the right product based on your aesthetic preferences and lifestyle.

Once the new stain and varnish are applied, your flooring professionals will buff the floors again and apply any trim or molding around the edges of the room. It’s important to remove any furniture or rugs from the room before this occurs, as the dust can linger on unprotected surfaces and create an unsightly mess.

Why You Should Hire a Professional for Roofing Installation

Roofing contractors is a vital part of your home. It protects you and your family from the elements and can also increase your home’s resale value.

Before a roofing project begins, the contractor will contact your city’s offices to pull the necessary permits. Once this step is complete, they’ll assemble your new roof.

roofing

A roof protects a home from harsh weather, debris, and other environmental factors. This shields valuable possessions in storage and other areas inside the house from moisture that can cause wood rot, mold growth and other damage. It also keeps out rain, snow, and intense summer heat to ensure you can live comfortably indoors.

A home’s roof shields it from inclement weather, debris, and other environmental elements. This prevents water, which can lead to wood rot, mold growth, and other damage, from getting to priceless items kept in storage and other parts of the house. It also ensures that you can live comfortably indoors by keeping out rain, snow, and the intense summer heat.

To keep your family safe and comfortable, make sure you hire a professional roofing contractor that uses high-quality materials and follows industry standards for safety and quality. Using the right tools and following safety precautions can prevent injuries caused by faulty nail guns, slipping on the roof or falling off extreme heights.

The first thing you should do is trim any trees that hang over your house. These branches are at risk of breaking during high winds and can damage shingles. Additionally, they may pose a threat during winter blizzards by hanging over utility lines or breaking windows.

Ensure that your roof has proper ventilation and insulation to prevent excess moisture that leads to mold and wood rot. Proper insulation will prevent warm air from rising into the attic, and a ridge vent will allow fresh air to circulate throughout the attic space.

Fascia boards are the edging pieces that run along the edges of your roof. Builders install these boards on top of the rafters, and they can also be used to support gutters. Homeowners might choose to upgrade their fascia boards by choosing more attractive styles and colors that can increase a home’s value.

An updated, sturdy roof adds to the value of your home. It protects you and your belongings from the elements, prevents moisture infiltration, and keeps mold, mildew, and other toxins from contaminating the inside of your home. In addition, a new roof is an energy efficiency upgrade. If your roof is made from premium shingles, it can increase the value of your home even more. However, it’s best to consult with a real estate agent and appraiser before making this kind of investment. They will be able to provide you with market data and help you decide what roofing materials are most appropriate for your home.

A modern, well-built roof raises the value of your house. It shields you and your possessions from the weather, stops moisture from seeping in, and stops mold, mildew, and other pollutants from poisoning the interior of your house. Furthermore, installing a new roof improves energy efficiency. Your home’s value may rise even further if your roof is composed of premium shingles. But before making this kind of investment, it’s best to speak with an appraiser and real estate agent. They will be able to give you information about the market and assist you in selecting the roofing materials that are best for your house.

A new roof is a great way to improve your home and boost its value, but it can also be disruptive for your neighbors. If you are replacing your roof, it is important to plan ahead and take the time to communicate with your neighbors about the process.

The first step is to inform your neighbors that the work will begin. This will give them the opportunity to make plans for the duration of the project. Your neighbors may have children or pets that will need to be relocated during the process, and they will appreciate the advance notice.

Another important step is to ask your neighbors to help you obtain quotes from contractors. This will help them feel involved and will likely lead to a more positive outcome for everyone involved. It is also a good idea to discuss the work that needs to be done and what you will be paying for, so there are no surprises down the line.

During the roofing process, there will be loud noises and vibrations that can affect your neighbors. To avoid any issues, it is best to start the job at a reasonable hour. In most areas, this means starting around 7:00 AM. This will allow your neighbors to get ready for work and will ensure that the workers aren’t disturbing anyone outside of their home.

Prior to the roofing installation, it is important to clear out your yard and driveway of any items that could be damaged. If you have a shed or garage that contains outdoor furniture or other equipment, it is a good idea to move these items into storage and cover them with a tarp. This will protect them from falling debris and prevent any damage to your property during the roofing process.

Additionally, it is a good idea to move any cars into the garage or onto the street for the duration of the project. This will save you the hassle of moving them later and will allow the contractors to access your roof more easily. It is also a good idea to move any children’s toys or patio furniture out of the way, as these items can be damaged by the construction process.

When it comes to home renovations, many homeowners feel confident enough to take on a project. This is especially true for smaller tasks, like painting or patching. However, major roofing projects are far from simple and should only be handled by a professional. The main reason why you should hire a professional is safety.

Climbing on a roof to perform repairs is extremely dangerous. This is one of the most common reasons for accidents in the construction industry, and thousands of people get injured every year due to ladder-related injuries. A good roofing contractor will ensure your safety by providing you with proper safety equipment and training. This will include a hard hat, harness, and proper use of tools like air compressor nail guns, staple guns, and sharp knives.

In addition to their experience, professional roofers have a strong understanding of local building codes and regulations. This means that they can help you choose the right materials for your roof and ensure it is installed properly to withstand different weather conditions. Moreover, they can offer you advice on how to take care of your roof to extend its lifespan.

Hiring a professional for roofing installation is also cost-effective in the long run. This is because you are less likely to have future repair costs when the job is done correctly. For example, a minor mistake such as failing to insulate your roof properly may lead to the development of mold, which will require expensive repairs.

A well-maintained roof can also improve your home’s curb appeal. This will make it more attractive to potential buyers and renters. In addition, it will reduce your utility bills as you will be able to maintain a comfortable temperature throughout the year.

Roofing is an essential part of any property, and it’s important to keep it in good condition. There are a variety of benefits to hiring a professional roofing contractor, including peace of mind, safety, and the added value of your property. However, it’s important to research your options and find a contractor who is qualified for the job. Be sure to look at their experience, insurance coverage, licensing, and customer testimonials before making a decision.